Enjoy an immaculate, super easy to cook, professional quality steak at home every time.
Watch these steps in action here
My name is Ona Lee, I am the chef owner of Clara’s Canning Co. Recently, Brianna asked me if I’d like to share a steak cooking method for the Widnor Blog, and I jumped at the opportunity. Because let me tell you, I had a transcendent experience with a skirt steak of theirs and it would be cruel to keep it to myself.
I am a born and raised 5th generation Washintonian, I grew in Seattle and in Eastern Washington at family farms on my moms side during the summer. The Sligars have farmed for as many generations back as anyone can count. I watched my uncles raise beef, I bottle fed calves, and changed siphon tubes in the wee hours of the morning. I spent time with my grandma Clara canning, cooking, sharing big meals, and even bigger laughter. Food has always been centered in my world, and in my professional life I have trained at excellent restaurants with top chefs and butchers from Seattle to NYC to Los Angeles. Since my son was born we have returned home to Washington, where I continue to work my family business and homestead. It is my joy to share not only the producers I think are doing an outstanding job in their field, but the methods I learned in my training so that you can create similarly stellar meals at home. Food tradition is exceptionally important, and I personally recommend you make Widnor Farms a part of your family table traditions.
I learned the classic sear and baste method while I was working the line at The Spotted Pig. I watched from afar as I worked my way up in the kitchen, the meat cooks holding down their stations with perfect rhythmic execution, it was mesmerizing. Flowing through tickets, calling shots down the line to garnishing stations, utilizing techniques I had never seen before. I figured it must be some magic I could never get the hang of, until I started on saute.
I am here to tell you, by following a few rudimentary steps, and learning to cook with all of your senses, you too can execute excellent steaks at home.
First, put the bottle of McCormick marinade down. It seems to me, based on what I have read and witnessed online, there are people that think the more you add to a steak or the more you garnish it, the better it is. There are certainly many ways to achieve beefy greatness, but the fundamental steps are universal. Let me show you the basics and why even top Michelin starred restaurants utilize the sear and baste method.
Step One: Temp and Season
Right off the bat let’s get into the number one secret for great steak, quality beef. Buying commodity beef is never going to give the same results as small farms that put their heart and soul into what they do. For this tutorial I used a dry aged, pasture raised skirt steak from Widnor Farms in Custer, WA. They have their farm stand open every Saturday from 10am-2pm. The Widnor homestead is a lovely place, their animals are happy and well taken care of, Brianna, Ryan and kids are all smiles. This means something, there is an energetic truth to food. Aside from exceptional feed and care, Brianna and Ryan put their love and attention into their ranch and family and it shows. It shows in their faces, the children, and especially in the final product.
To make eating only local pasture raised beef at home affordable, we eat better meat much less often, and integrate grind into our weekly meals. At times we splurge a bit, there is no way to put a price tag on eating the best for your body and the land while also supporting local agriculture.
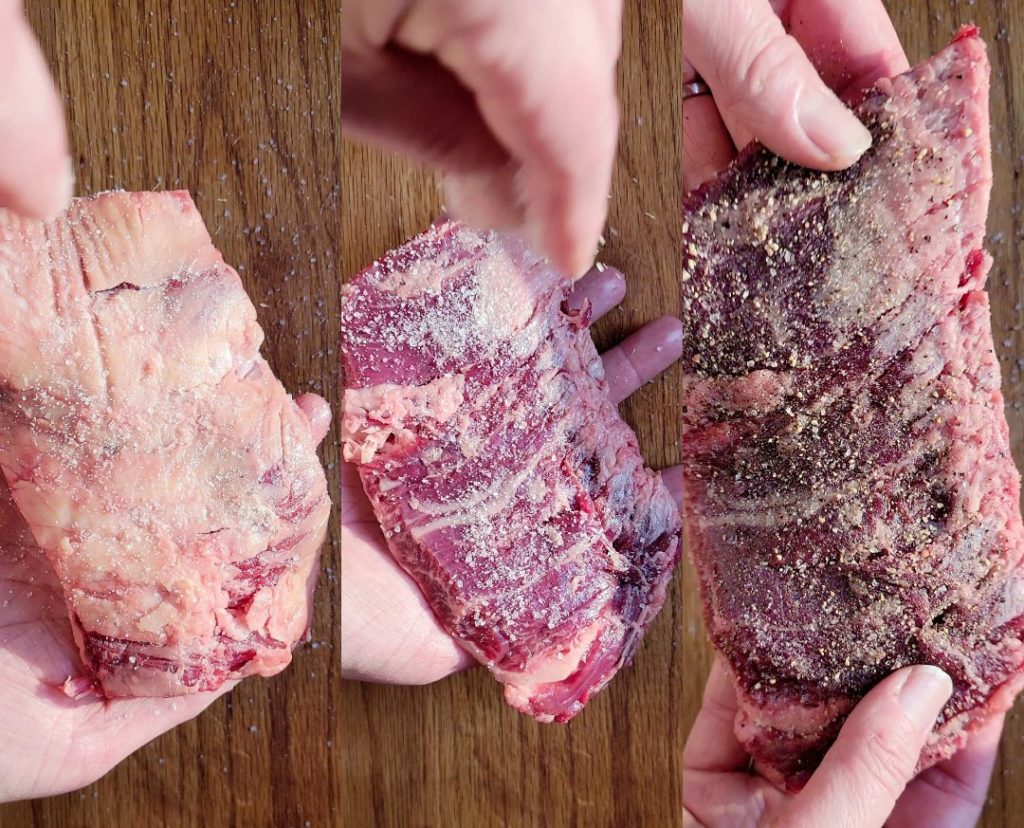
What goes hand in hand with proper beef? Proper seasoning. I use only whole mineral salt whether it be by sea or ancient land, because again, why eat something that has no real value. Using refined salt with everything good stripped out is a big missed opportunity to make sure we are getting full spectrum minerals. My favorite salts are: True Salt for any kosher type needs and pictured above, Utah Real Salt as a fine grain salt, San Juan Sea Salt for kosher and finishing, Full Bloom Farm on Lummi for finishing, Maldon for finishing, and sometimes Sel Gris for finishing which I pick up in the bulk section at my local health food coop. I tend to stay away from pink Himalayan because I am unsure of the mining practices, it comes from great distances, and anything that gets too popular too quickly is sure to cause a negative effect.
Allow your steak to come up to temperature before seasoning or searing, this leads to more even cooking and fully bloomed flavors. I let mine sit on a plate or seasoning rack for about 30 minutes to an hour before I get going. During this time I get whatever side dishes I am serving alongside together.
Start your process by seasoning great beef with great salt and fresh cracked pepper. I prefer to pepper only one side, the side I will sear second, this helps prevent the oils in the pepper from burning. Season liberally on all sides, patting and pressing it into the meat.
Step Two: Sear
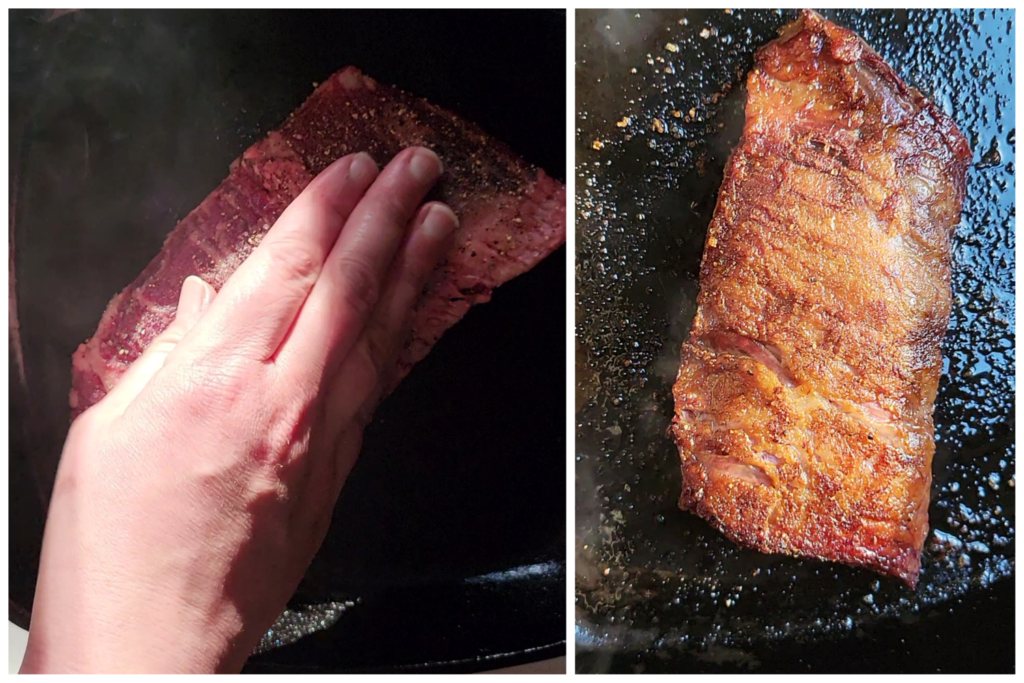
Not skimping in this process is absolutely crucial to ending up with a steak your friends and family will talk about for ages. I use carbon steel or cast iron pans for high heat sauté cooking at home. I stay away from non-stick at all costs. I always start the sear on the fattiest side, by doing this we can render our own cooking medium that can withstand high temps right in the pan. This will also transform rubbery fat into toasted, crunchy divinity
This process is why we should not have anything containing garlic, herbs, or onion on the meat to begin with. Those aromatics are far too delicate for a process so aggressive. They will come in later down the line, don’t you worry.
Press the steak only to start, if you are worried about your hand you can use a spatula. The muscle and fibers in the tissue will tense up at first when dropped into a hot pan, a little press helps prevent the steak from curling which will make an even sear impossible. Once it has relaxed, after just a minute or so, do not press. Pressing throughout the process will lead to dryness. Make sure you have your hood vent on high, or some doors and windows open, searing can create some vapor. If working a bone in steak, start to baste the bone and around the bone in the searing process.
Sear your cut on all sides over medium high to high heat depending on thickness, in either its own rendered fat, lard, clarified butter, or rendered bacon fat. For thin steaks, we need high heat so the steak browns before overcooking. For thick steaks, we need more of a medium high heat to get a good crust without burning. And when I say all sides, I’m talking all sides. The pictured skirt steak is simple because it is a fairly flat cut, so I really only have two sides to worry about. But if we were doing a porterhouse or rib-steak, we would be starting with the fat cap on the sides first, and then working our way to each open face. If you want to go above and beyond, leave your beef unwrapped and uncovered in the fridge for a day or two to dry a bit. The dryer your meat, the better it will caramelize, and the more concentrated the flavor will be.
Once the steak is golden brown on all sides possible, remove it from the pan, drain the oil, and wipe the pan if it has a bit of carbon build up. Let the skillet cool a little before starting the next step.
Step 3: Baste
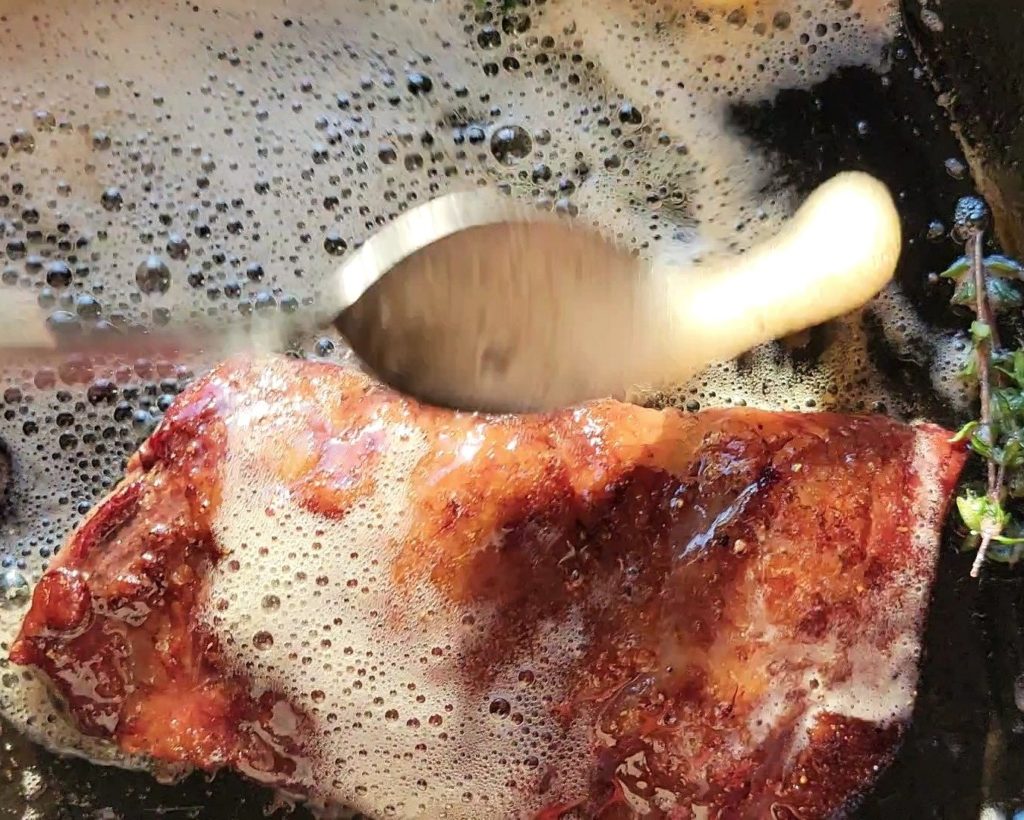
To baste is to flick spoonfuls of happily bubbling butter over the meat repeatedly, this helps round out the color, and adds toasted nutty flavor of browned butter carrying the scent of aromatics.
Once your pan has cooled to a medium temperature, over a med-low to medium heat, add a big lob of butter. At least two ounces, this sounds like a lot but this is a cooking medium, you will not end up eating all of it in one sitting. Along with the butter toss in a crushed garlic clove and an herb spring, like thyme, rosemary, savory, or marjoram.
Tip your pan to one side and keep the butter constantly moving over the steak, observe the bubbles and color in the photo above. Happy bubbles means the butter is at the perfect temperature to brown the meat but not become totally blackened. You will need to keep an eye on a few things at once in this process, the heat of your pan and the thermal reading of your cut. If your butter is too cold, it will over cook your meat without lending much of anything. If your garlic or herb is getting too much heat, spoon them onto the steak to prevent burning.
For boneless cuts ranging 6-16 oz, you can finish completely on the burner. For larger or bone in cuts, and additional step of finishing in an oven at 400 degrees will be necessary.
There are no minutes or exact times here, the only way to really know precisely where you are at is by using a probe thermometer through the thickest part of the steak. Remove the meat 2-5 degrees below your desired temperature, it will finish in the resting process.
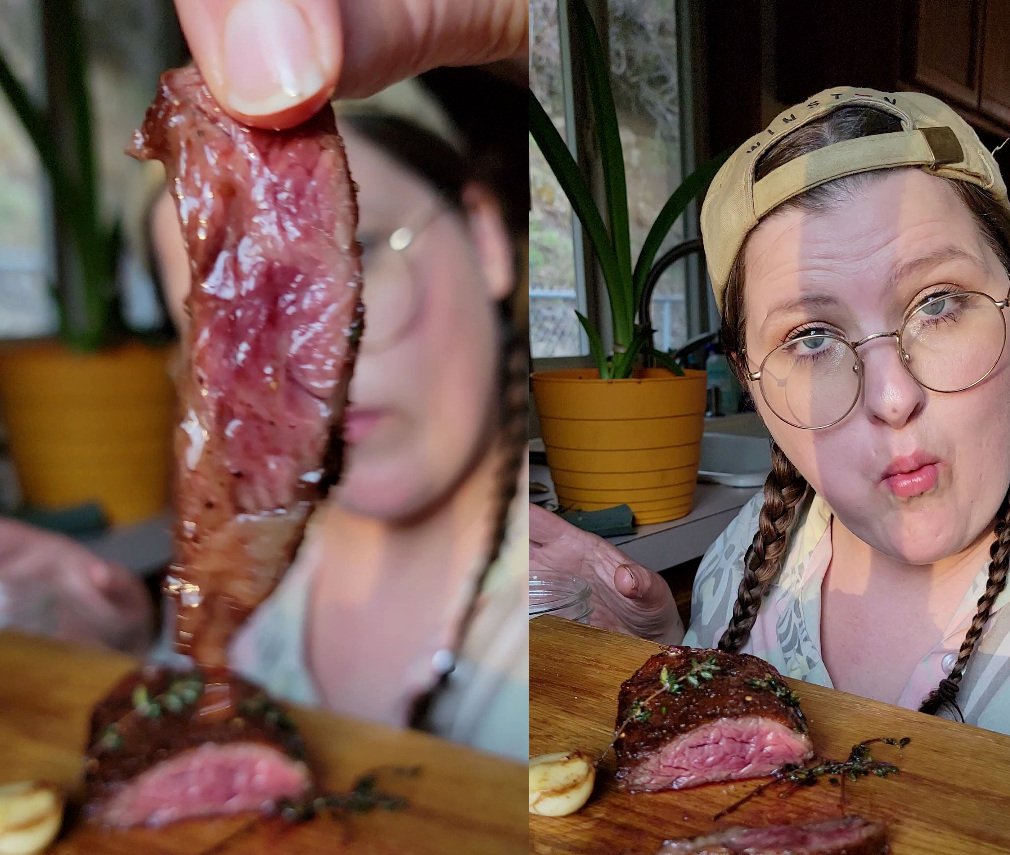
For a rare steak, remove at 118F. For med-rare, remove at 125F. For medium, remove at 136F. For medium well, remove at 140F. For well done, remove at 155F.
Step 4: Rest and slice
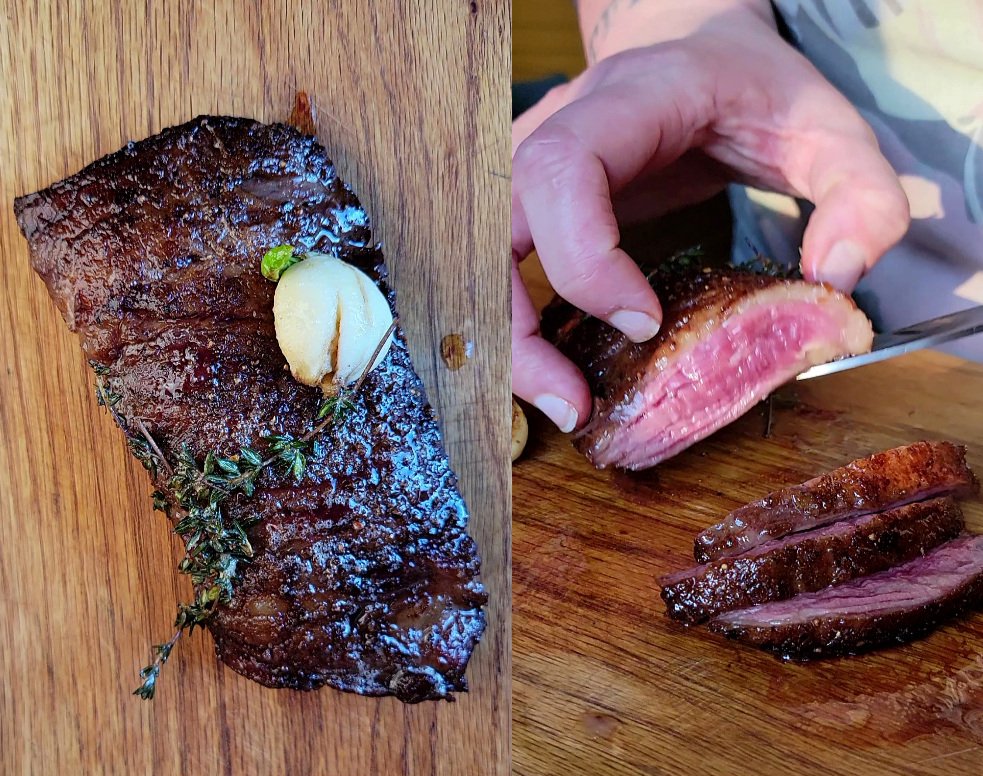
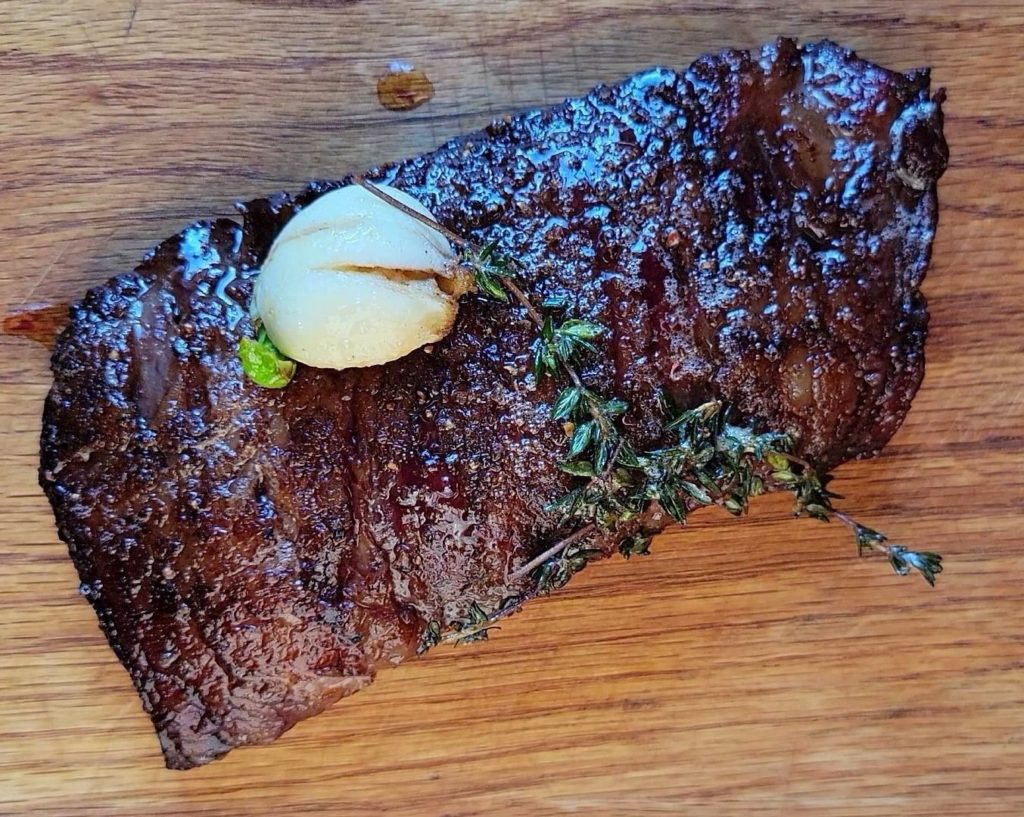
Just a few moments more and we have arrived at our final destination. Resting meat is the final crucial step to a superb final product. Once you have hit your desired temp, remove from the pan and rest on a rack or a plate for up to 10 minutes. I like to place the aromatics and a spoon of the basting butter over, a bit of crushed chili, and perhaps a squeeze of lemon.
To slice, make sure your knife is very sharp and use minimal sawing strokes. Dull knives and sawing will extrude succulent juices you’ve worked so hard to produce. For this reason, I do not leave the slicing to the plate. I make sure all of my side dishes are ready to go, slice, and serve. I like to finish with some crunchy salt like Maldon or Sel Gris on the center of my slices but this is purely personal preference. If you’d like to get the full saute cook experience, dip some toasty rustic sourdough into the basting butter and resting juices.
At this point, I hope you feel completely confident in trying this method. It produces sensational results, while building your cook senses. From cow to cow, cut to cut, everything is a variable. To work with our senses is to be able to flow with the natural variation in our food and adjust as necessary in the moment. This connection is a beautiful thing, especially when we are also connected to where our food comes from. It tickles ancient seeds, but be well aware, once these seeds fully bloom you will be unable to go back to commodity beef and grey meat. You will feel the difference.
Eat food that lights you up, even after a thousand times. Widnor Beef did that for me, I’m going to be at that stand as often as we can. I am hooked and will work my way through every animal and every cut they offer.
I will also continue to share my experience with Widnor meats and in the meantime, get out there and feel your way through some amazing food that nourishes your home, body, and soul.
– Chef Ona Lee


Wow! Nice to learn something new!!! Thank you! ❤️